Monday 28 April 2014

Wayne Thiebaud Inspired Cake Paintings


My older students (8-12) had such a blast creating these acrylic cake paintings inspired by the art of Wayne Thiebaud.  I talked to the kids about applying the paint to look like frosting, and to think about what flavour their layer cakes would be and what colours would work best to show each flavour.  I also shared with them that even though Wayne Thiebaud created paintings of cakes he actually prefers to eat pie!


Our Inspiration: Wayne Thiebaud's Lemon Cake, 1964


The Kids' Artworks:


Art Intertwine - Wayne Thiebaud Cake Paintings For Kids


Art Intertwine - Wayne Thiebaud Cake Paintings For Kids


Art Intertwine - Wayne Thiebaud Cake Paintings For Kids


Art Intertwine - Wayne Thiebaud Cake Paintings For Kids

Art Intertwine - Wayne Thiebaud Cake Paintings For Kids


Art Intertwine - Wayne Thiebaud Cake Paintings For Kids


Art Intertwine - Wayne Thiebaud Cake Paintings For Kids


Art Intertwine - Wayne Thiebaud Cake Paintings For Kids


Art Intertwine - Wayne Thiebaud Cake Painting For Kids


Friday 25 April 2014

Art Fun For Fridays - Digital Painting Using Body Movement


Today's online art game is Airbrush from Tate Modern's kids zone.  To create virtual paintings, Airbrush uses body movement in place of a paintbrush.  Whether its by moving just one finger or from dancing with your whole body, this activity definitely offers an interesting way to create art.


To play Airbrush click HERE


Friday 18 April 2014

Art Activity - Picasso Cubist Faces


Art Intertwine - Picasso Cubist Faces


This week the rec centre's summer guide came out and on the cover are a bunch of the kids from my art camp showing off their Picasso cubist faces!


I originally saw the cubist faces HERE and thought that it would make a nice addition to my Picasso inspired art camp.  Since I don't have access to a kiln and I needed to keep my supply costs to a minimum, I used my homemade model magic recipe instead.  I made these with my older group (8-12) first and had a few problems with the faces cracking and breaking as they dried.  This meant that I had to spend time gluing them back together (not fun).  Due to this, I decided to make the same face shape ahead of time for my younger group (5-8) and had them just create the facial features. 


Art Intertwine - Picasso Cubist Faces

 You can see in the face above where I repaired the large crack line-so frustrating!


Art Intertwine - Picasso Cubist Faces

After rolling out our model magic and cutting the face shape I talked to the kids about adding a line down the middle to create a view of the face in profile, making it wavy to show the shape of the nose and mouth.


Art Intertwine - Picasso Cubist Faces


Art Intertwine - Picasso Cubist Faces

After painting their base colours I invited the kids to add different patterns to further distinguish the two views of their faces.

Art Intertwine - Picasso Cubist Faces


Art Intertwine - Picasso Cubist Faces

This kid really took to adding texture to her face, with some cool results.


Art Intertwine - Picasso Cubist Faces


When making the faces use a chopstick or dowel to create holes for the addition of pipe cleaner hair.  Here are the older group's faces with some crazy hairdos:


Art Intertwine - Picasso Cubist Faces


Art Intertwine - Picasso Cubist Faces


Art Intertwine - Picasso Cubist Faces


Art Intertwine - Picasso Cubist Faces


Art Intertwine - Picasso Cubist Faces


Below are the Cubist faces of my younger group.  Even with the same face shape there was an awesome variety in the end results.


Art Intertwine - Picasso Cubist Faces


Art Intertwine - Picasso Cubist Faces


Art Intertwine - Picasso Cubist Faces


Art Intertwine - Picasso Cubist Faces


Art Intertwine - Picasso Cubist Faces


Art Intertwine - Picasso Cubist Faces


Art Intertwine - Picasso Cubist Faces


Saturday 12 April 2014

Today's Artistic Inspiration - Annie Boyden Varnot


Detail of Trap


Annie Boyden Varnot creates her amazing sculptural landscapes using colourful plastic drinking straws. 


Perelandria
Created using: plastic drinking straws, pompoms, pearler beads, coloured wire, and illuminated pedestal


Trap
Created using: plastic drinking straws, coloured wire, q-tips, pompoms, and mirrored animals


All images from http://www.annievarnot.com © 2011 Annie Varnot


Thursday 10 April 2014

More Paul Klee Cat and Bird Batiks


Art Intertwine - Glue Batik Klee Cat and Bird
For detailed instructions on how my students created these faux batik artworks click HERE.


Below are the rest of the Paul Klee inspired batiks that my students created.  Both age groups (5-8 & 9-12) did an awesome job, with every cat showing a lot of personality.   As a side note, while our inspiration was Klee's Cat and Bird, I found that it was easier for the younger kids to draw their cat thinking of a fish. 


Art Intertwine - Glue Batik Klee Cat and Bird


Art Intertwine - Glue Batik Klee Cat and Bird


Paul Klee Cat and Bird Art Activity For Kids


Paul Klee Cat and Bird Art Activity For Kids
 I love how this student put the fish into an actual thought bubble.


Paul Klee Cat and Bird Art Activity For Kids


Paul Klee Cat and Bird Art Activity For Kids

This student decided not to paint her entire background, but what she did paint shows a rainbow of colour.


Paul Klee Cat and Bird Art Activity For Kids


Paul Klee Cat and Bird Art Activity For Kids


Paul Klee Cat and Bird Art Activity For Kids


Paul Klee Cat and Bird Art Activity For Kids


Monday 7 April 2014

Homemade Art Aprons For Kids


Art Intertwine - Kid's Art Apron


As part of my planning for this summer's art camps (don't worry I haven't lost my mind, I do realize that its only April)  I decided to create some art aprons for the kids.  In the past kids have brought aprons or worn old clothes, but there's always at least one kid that decides to wear their brand new t-shirt despite the warning that art camp = awesome messiness. Since I usually have around 10 kids a week, making art aprons really isn't a huge undertaking.

Before starting I decided to look online to see if there were any templates or suggestions that would fit my needs.  There a quite a few examples that create kids aprons from old tea towels, but I felt that the fabric would be too thin, and paint would seep through onto the kid's clothing thus defeating the purpose. There were also some that included hemming the apron to create a pocket, but I instantly had visions of myself searching for lost art supplies 
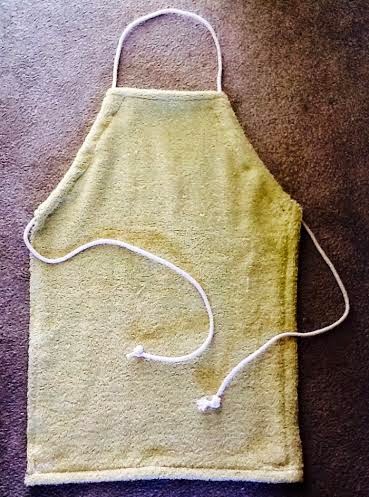
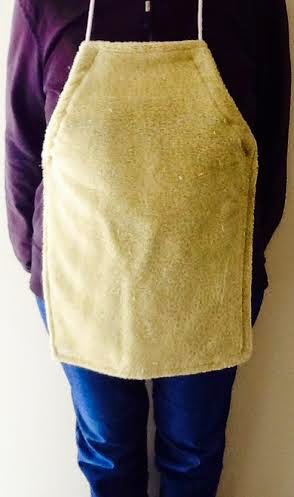
that kids have tucked away.  I liked the idea of repurposing rather than buying new fabric, and decided to try using old terry towels.  The only example I could find of an art apron from a terry towel didn't really fit the child properly.  Realizing that I wasn't finding what I really wanted, my mom being the awesome lady that she is, dug out an old apron from my childhood.


Art Intertwine - Kid's Art Apron Template
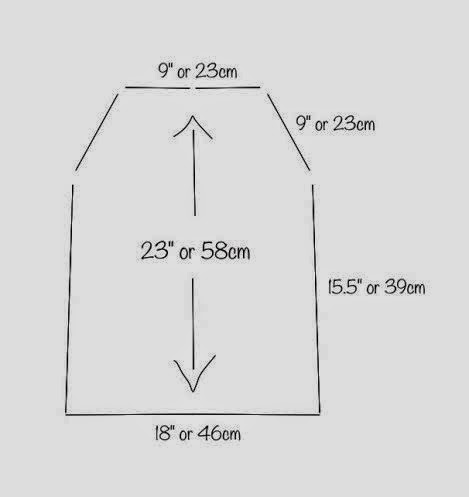
These measurements include a 1-1.5 inch allowance on all sides.


Using this as a template, I cut up the towels getting 1 or 2 aprons depending on the size of the towel and its style.  Be aware that trim on towels bunches the fabric and will make your apron look weird if you include this part of the fabric when you sew it.  Since these art aprons will be covered in paint and other art materials and the terry towel is a thicker fabric, I did a very basic sewing job not bothering to create perfect hems or to pin the fabric.  Instead I used a zigzag stitch to stop any fraying.


Art Intertwine - Kid's Art Apron


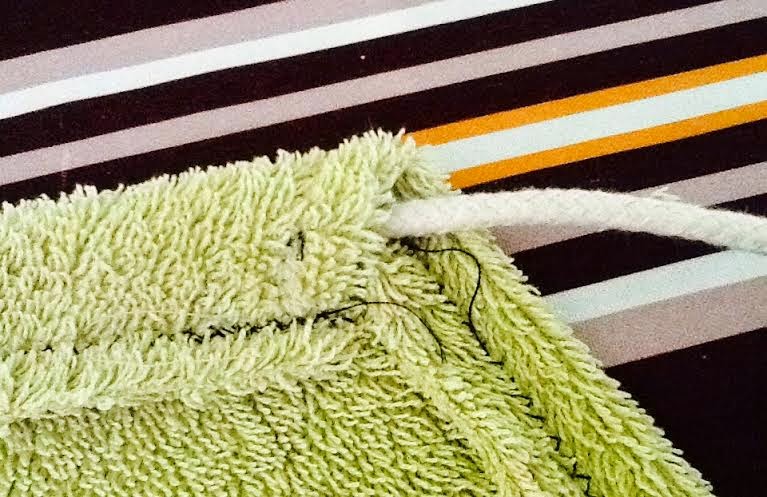
For the ties I bought fabric rope at the dollar store, similar to shoelaces, for $1.50 a package.  I used fabric rope since it will create knots that are easy for the kids (and myself!) to untie.  A package of 20 ft gives you enough for 3 aprons.  Simply tie a double knot on each end and wax the ends to stop fraying.  Instead of feeding the rope through the fabric I instead laid the rope onto the armpit areas of the apron, folded over the fabric and zigzag stitched the fabric to make the loop for the rope to pass through.


Art Intertwine - Kid's Art Apron

Overall, it took a bit of time to figure out the best way to create them, but once I got going these art aprons were pretty much a snap to make.


Related Posts Plugin for WordPress, Blogger...