Sunday 29 December 2013

Silk Screened Mythological Creatures


This year I decided to give silk screened pillowcases as Christmas gifts.  After creating my own silkscreens using embroidery hoops, fabric, and mod podge, I chose the theme of mythological creatures.  Who wouldn't want to wake up every morning next to a tentacled Kraken or fire breathing Dragon?


Art Intertwine - Silkscreen Dragon


Art Intertwine - Silkscreen Kraken


Thursday 12 December 2013

Picasso Inspired Cubist Guitars - Ages 8-12


Here are the Picasso guitars done by my older elementary ages students. 

To view those done by my younger students click HERE.


Art Intertwine - Cubist Guitar Art Lesson


Art Intertwine - Cubist Guitar Art Lesson

 I really like how this student decided to paint an electric guitar rather than an acoustic one.


Art Intertwine - Picasso Art Activity


Art Intertwine - Cubist Guitar Art Lesson

 This student decided to add a pick to the left of her blue guitar.


Art Intertwine - Picasso Art Activity


Art Intertwine - Picasso Art Activity

 I love the use of only dark reds in this painting.


Art Intertwine - Picasso Art Activity


Art Intertwine - Picasso Art Activity


Friday 22 November 2013

Art Fun For Fridays - Creating Comics


For this Friday have fun creating a comic strip at Make Beliefs Comix.  An added bonus, you can print and email your finished comics.


The site also offers a ton of free printables, including art themed ones like the image below.


Friday 1 November 2013

Homemade Spider and Victim Outdoor Halloween Decorations


I hope everyone had a spooktacular Halloween yesterday.  This year I decided try going beyond just carving a jack-o-lantern, and ended up making a creepy spider along with a person (an unlucky trick or treater?) caught in the web.  I was able to create everything using items that I already had laying around the house as well as some materials that would normally end up in the recycle bin.  Overall I only had to spend a total of $2.50 on cobwebs!  It was awesome to see trick or treaters taking pictures of everything and I've already started to think of ideas for next year.

Here are a few pics:


Homemade Halloween Decor - Large Spider


Homemade Large Spider for Halloween

 You can just barely make out the spider egg tucked in the rafters above the spider


Art Intertwine - Homemade Spider and Victim Halloween Decor

You can see my big grinned jack-o-lantern in the background


Art Intertwine - Spider Victim Halloween Decoration


Monday 23 September 2013

Picasso Inspired Cubist Guitars - Ages 5-8


I originally saw this lesson idea at Do Art! and thought it would be a great addition to the weeks when my art camp students created art inspired by Picasso.  I talked about Picasso's Blue and Rose Periods, his use of musical instruments as a subject matter, and Cubism.  When creating their drawings I also covered the different parts of an acoustic guitar.  I then invited the kids to paint their guitars using a variety of tints and shades of one colour.  I found that with my younger students, they lost the shapes of their guitar and Cubist background when they outlined their artworks at the end.  This led to some being more organic-a very interesting 'mistake', but next time I would have the younger kids at least outline their guitars prior to painting.


Art Intertwine-Picasso Inspired Guitar Paintings


Art Intertwine-Picasso Inspired Guitar Paintings

I particularly like the contrast of the more organic background with the guitar's geometric shapes in this student's yellow artwork.


Art Intertwine-Picasso Inspired Guitar Paintings


Art Intertwine-Picasso Inspired Guitar Paintings

This student used her favourite colours of pink and purple instead of tints and shades for the background.


Art Intertwine-Picasso Inspired Guitar Paintings


Art Intertwine-Picasso Inspired Guitar Paintings


Art Intertwine-Picasso Inspired Guitar Paintings


Friday 13 September 2013

Art Fun For Fridays - The Secret City


For this Friday its a bit of a stroll down memory lane.

I recently came across this video of a drawing tv show called The Secret City.  I used to love watching this show as a kid, and have fond memories of re-creating many of the 'secret cities'.


Monday 9 September 2013

Summer Art Camp 2013 Sneak Peek


How did I spend my summer vacation?  Well, here's just a few of the amazing artworks my campers created this summer.


Monday 19 August 2013

Art News - Mona Lisa's Identity

Salvador Dali, Self Portrait as Mona Lisa, 1954


Click HERE for a recent story on the discovery of remains that could bring researchers one step closer to confirming Lisa Gherardini as the sitter for Leonardo Da Vinci's Mona Lisa.   


Monday 12 August 2013

Summer Art Camp Shout Out


I can't believe the summer is almost over!  I have so many awesome artworks to post. 

For now I just wanted to share that one of the kids from my summer art camp was chosen to be on the cover of the rec centre's upcoming activity guide, showing off the awesome dragon puppet (like the one above) that he made at my camp.

Sunday 14 July 2013

Homemade Model Magic Recipe


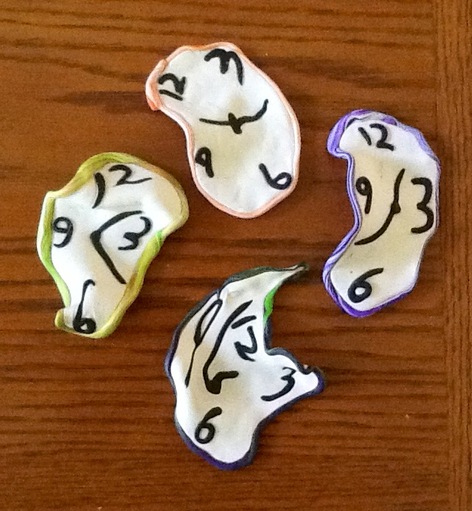
As promised, here is the recipe for model magic that I used to create my swirled lollipops.  I originally saw this recipe at Southern as Biscuits.  I experimented with the resulting 'clay' for various projects and in turn had various levels of success and failure, which will be expanded on in an upcoming post.  To save your creations just leave the model magic out to air dry.


Materials:

1 cup Cornstarch
2 cups Baking Soda
1 1/4 - 1 1/2 cups Cold Water
Food Colouring-optional


Steps:

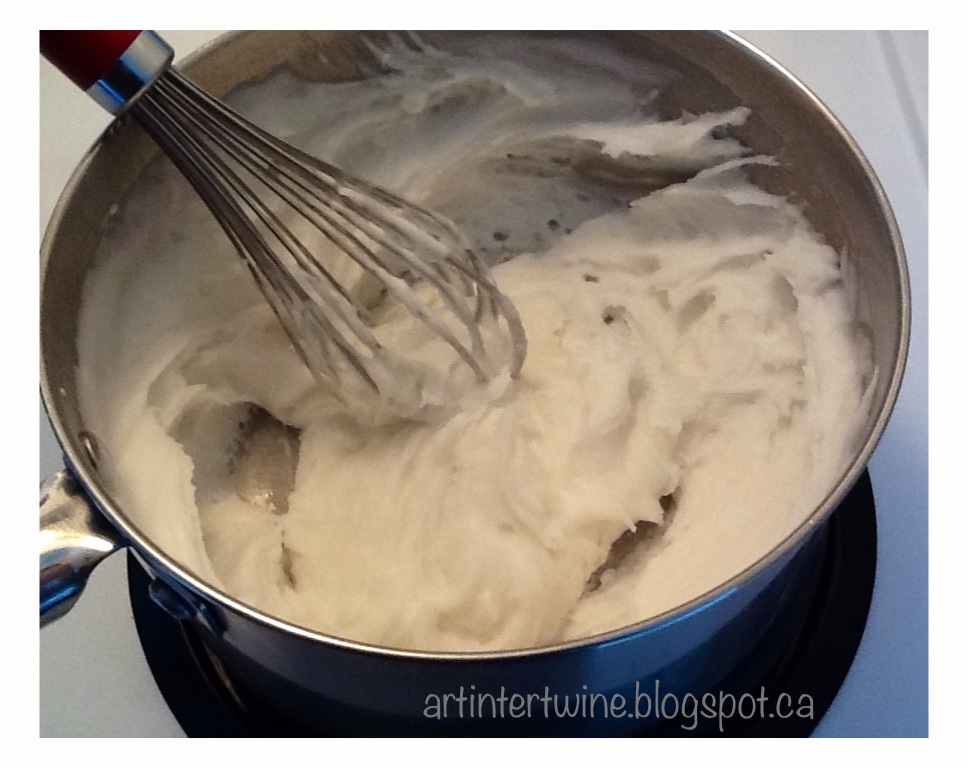
Put all the ingredients in a pot and whisk to break up any lumps.


Start cooking over medium heat.


After about 10 mins the mixture will start to bubble and thicken.  Keep whisking!


The mixture will start to look like mashed potatoes and pull away from the pot.  At this point take the pot right off the heat.


Use a spatula to scrape the mixture from the pot into a bowl to cool.


Next take a tea towel and thoroughly wet it so that it is damp, but you don't want it to be soaking wet.  Place the tea towel directly on top of the mixture and leave it to cool in the bowl (about 30 mins).


Once the mixture is cool knead it by hand to bring it to a smooth clay-like consistency.  If it is too wet and sticks to your counter top, just knead in a bit more cornstarch. You can also add in gel food colouring to part of your model magic at this stage, in order to create multiple colours from one batch.  Just make sure that the colours you add are dark, since they will become lighter once the clay has dried.


The recipe ended up making just under 2 pounds of model magic.


To store the clay wrap it in a damp paper towel and place in a plastic Ziploc bag.  You can leave the bag of clay on the counter or in the fridge if you want it to last longer.


Friday 14 June 2013

Art Activity - Salvador Dali Melting Clocks


Like a lot of teachers I've been counting down the last few weeks of the school year.  I'm also, however, counting the days until the start of my summer art camps-July 2 !!!!  Since time seems to be very present at the moment, I thought I'd share these Salvador Dali inspired melting clocks.  The clocks were made using sculpey and were originally round circles.  I then gently pulled and stretched to create the final distorted 'melted' look. 


Art Intertwine - Salvador Dali Melting Clocks


****Super soft sculpey will not work for this art activity, it actually stretches too much!


Friday 31 May 2013

Art Fun For Fridays - Storybird


Last week while subbing, one of my classes was working on a project that intertwines art with writing, by using Storybird. If you aren't familiar with Storybird, the idea is that the writing/illustrating process is reversed, with students creating their story based on a collection of illustrations, rather than finding images to fit their story.  While some teachers may not like the idea that students don't create their own images, I like Storybird for the fact that it privileges art in the real world, as well as promoting current artists.  Students can also move their stories beyond the digital realm and have their finished stories published in physical book form.


Wednesday 29 May 2013

Art Activity-Pattern Drawings With Coloured Circles


Art Intertwine - Patterned Drawings With Coloured Circles


This week I was subbing for a grade 7 art class and was looking for a project that was both simple to do, and which the students could get started on right away.  I happened to come across this gem at artisan des arts.

I used standard 8.5x11 photocopy paper, but you really could use any paper.  I instructed the students to cover the entire page with doodles-a combination of patterns, drawings, and even words, stressing that they need to have a variety.  I had the students use black sharpie to create a nice bold graphic effect.  After students had filled the page with their doodles, I had them trace 3 or more circles anywhere on their paper, but you could of course do any shape.  The area inside each circle is the only place where the students could add colour, so I explained to the class that they wanted to trace their circles over doodles that would create visual interest.  The students then used markers to add colour to their drawings.  Not all of the students were able to finish in just one class, but they all created some very cool artworks as you can see below:


Art Intertwine - Patterned Drawings With Coloured Circles


Art Intertwine - Patterned Drawings With Coloured Circles


Art Intertwine - Patterned Drawings With Coloured Circles

This student decided to create more smaller circles by tracing her pencil sharpener.


Art Intertwine - Patterned Drawings With Coloured Circles


Art Intertwine - Patterned Drawings With Coloured Circles


This student wanted to create more of a complete image, but also included a wonderful pattern with the waves.


Art Intertwine - Patterned Drawings With Coloured Circles


Art Intertwine - Patterned Drawings With Coloured Circles

This student wanted to try adding colour with pencil crayon.  I liked the outlining she did, especially with the green swirls.


Tuesday 7 May 2013

Art Activity - Swirled Lollipops Made From Homemade Model Magic


Just a quick post to show one of the projects I made in my search for a homemade substitute to clay-in this case model magic.  I will be posting the recipe in the near future, but for now enjoy these whimsical lollipops.


Art Intertwine - Homemade Model Magic Lollipops


I was inspired to create these after seeing a post from The Elementary Art Room! .  I didn't have popsicle sticks at the time so instead I used a pencil and a felt marker to create the handles.  I would however use a popsicle stick in the future since I had to re-roll my lollipop after the marker end stuck out the back in my first attempt.  I also found that the lollipops cracked a little bit when they dried, but this wasn't a big deal since they stayed intact.   To colour the lollipops I used my homemade liquid watercolours which gave them a nice soft blended effect.


Monday 15 April 2013

Art News - Rubik's Cube Art


I wanted to share this story about a local Victoria student who used Rubik's cubes to create the artwork below.  The portrait of past Canadian prime minister Lester B. Pearson uses 1,200 Rubik's cubes!  This could be a great example to bring in when teaching value or to combine art with math, when teaching students about scale.

Click HERE to read more


Pearson College student Leo Yousif stands next to his seven-foot-high portrait of Lester B. Pearson.  Photograph by: Darren Stone, Victoria Times Colonist


Friday 12 April 2013

Art Fun For Fridays - Puzzles of Famous Artworks


For today's art fun I got this puzzle of Vincent Van Gogh's The Starry Night from Jigzone.  For more puzzles of artworks you can visit their site by clicking HERE.  You can also upload a photo to create a puzzle out of your own art.


Thursday 4 April 2013

Art Activity - Sumi-e Ink Brush Painting

Art Intertwine - Sumi-e Bamboo Painting

I thought I would share some of my students' sumi-e paintings, as well as some information about sumi-e if you decide to create your own ink brush paintings.


What is Sumi-e?

Sumi-e is a Japanese word that means "ink picture." The ink is called "sumi." When you put the "e" on the end of the word, it means "ink picture."

Sumi-e is an art form with deep feeling. The point of sumi-e is not just to reproduce the appearance of the subject matter, but to capture its spirit.  Therefore, to paint a flower, you don't need to perfectly match its colour and paint every petal, instead you paint the flower's essential shape and try to convey its fragrance and how it moves in the breeze.


To create sumi-e paintings artists use special materials.

The first two are the inkstick, or sumi and the inkstone. In Japan artists had to create their own ink for these paintings.

Artists usually grind their inkstick over an inkstone to get their ink. An artist puts a few drops of water on an inkstone and grinds the inkstick in a circular motion until a smooth, black ink is made to the level of darkness the artist wants.

Next are the brushes. Sumi-e brushes are similar to the brushes used for calligraphy and are traditionally made from bamboo with animal hair.

The last material is the paper, which is usually handmade and generically referred to as rice paper.


Sumi-e artists first learn how to create 4 different types of pictures. These pictures are called "The Four Gentlemen".  "The Four Gentlemen" is a term used to refer to four specific subjects (orchid, bamboo, plum blossom, and chrysanthemum) which are some of the first subjects that art students learn. Each subject focuses on a different brush technique. They also represent four seasons and four desirable personality traits. They are called "Gentlemen" because in Japan desirable personality traits were gentlemanly qualities.


The Four Gentlemen

The plum represents winter. The plum symbolizes "a man with great character", an active, positively turned towards life, elderly person. Fragile flowers appear in springtime on its knobby, twisted branches. 
 
The orchid represents spring. The graceful wild orchid corresponds with the Japanese ideal picture of a woman. The orchid symbolizes elegance and simplicity. 
 
The bamboo represents summer. The bamboo symbolizes vitality, enduring strength, integrity. The bamboo has straight, high towering up branches (which portray integrity), evergreen leaves and amazing flexibility.

The chrysanthemum represents autumn. The chrysanthemum exemplifies admirable qualities. Traditionally the chrysanthemum was the royal symbol of the Japanese emperor-house.


Here are some sumi-e examples my younger students did where they painted bamboo:


Art Intertwine - Sumi-e Bamboo Painting

Art Intertwine - Sumi-e Bamboo Painting

Art Intertwine - Sumi-e Bamboo Painting

Art Intertwine - Sumi-e Bamboo Painting

Art Intertwine - Sumi-e Bamboo Painting

Art Intertwine - Sumi-e Bamboo Painting

Art Intertwine - Sumi-e Bamboo Painting

Art Intertwine - Sumi-e Bamboo Painting


Related Posts Plugin for WordPress, Blogger...